 |
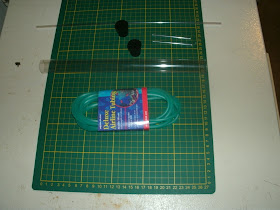
| Photo 1 - Parts for Condenser |
 |
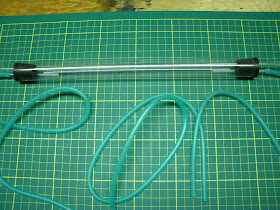
| Photo 2 - Inner assembly |
 |
| Photo 3 - Fully assembled |
 |
| Photo 4 - Full set-up |
Condenser
A condenser is used for distilling and separating chemicals in fluids. They can be a very expensive item. In the photos above you can see how I made one from items I found in a pet store - total cost less than $5.00.
Items needed:
1) Outer tube (approx. 12 in. long, 22 mm inside dia.) - Large diameter plastic tube - can any kind of tube clear plastic, white plastic or black plastic tubes. As well as copper or glass tubes.
2) Inner tube(longer than outer tube, 16 in. long, 5 mm outside dia.) - Small diameter plastic tube - can also be glass tubing (I recommend glass f you can get it).
3) Inlet and outlet tubes(2)(3 inches long, 5 mm outside dia.) - Small diameter plastic tube.
4) 2-hole rubber stoppers (2) - They fit tightly into the large diameter tube. No. 4 stoppers fit best for my set-up.
5) Rubber tubing(fits 5 mm outside dia. tubing) - Used to run water into and out of the condenser. This is air tubing in the aquarium section.
First photo shows you the collected items.
Second photo shows how to assemble the inner tubing.
Third photo shows the condenser put together.
Fourth photo shows the condenser in working mode. Notice the baby fruit jar (I talked about this in the previous post) being used as the flask to be heated and the baby food jar(I talked about this in the previous post) is used for collecting.
No comments:
Post a Comment