Saturday, September 8, 2012

Even More Books

Modern Book

Older Books

I have picked up 3 more books for my library. 2 are older and from a better time for citizen science. The other one newer but important for the amateur scientist. (I truly dislike using amateur or citizen scientist. It gives the impression that real science can not be done by them.)

1) Apparatus - 1967 by F. F. Blackwell.

This book shows you how to build various science equipment from household materials. Focusing more on the physical sciences but can be applied to the biological as well. Sections include:

Elementary electricity, Biological apparatus, Light, Machines, Air, Sound and heat, Water, Weather and soil studies.

2) Procedures in Experimental Physics - by John Strong. Originally published in 1938 republished 1986.

Another book dealing with physics. It has great explanations of certain techniques. This book and The Amateur Scientist by C.L. Stong make for great physics experiments of old. Sections include:

Glass blowing, High Vacuum technique, Optical work, Photoelectric cells, Heat and high temperature, Molds and casting, etc.

3) The Laboratory Companion: A Practical Guide to Materials Equipment and Technique - by Gary S. Coyne 2006.

This is a very useful book that discusses the different materials used in labs and how to maintain them. This is a modern book discussing modern equipment.

When I look at some of the older books I pick up I can't believe how many books existed that helped young people build their own labs and equipment. A far cry from what you find today. I am glad that I am still able to find some of them.
Friday, August 17, 2012

Condenser

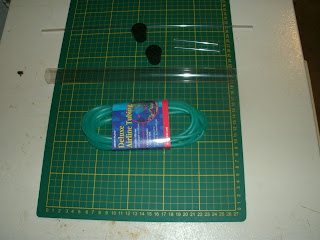
Photo 1 - Parts for Condenser

Photo 2 - Inner assembly

Photo 3 - Fully assembled

Photo 4 - Full set-up


Condenser


A condenser is used for distilling and separating chemicals in fluids. They can be a very expensive item. In the photos above you can see how I made one from items I found in a pet store - total cost less than $5.00.

Items needed:

1) Outer tube (approx. 12 in. long, 22 mm inside dia.) - Large diameter plastic tube - can any kind of tube clear plastic, white plastic or black plastic tubes. As well as copper or glass tubes.
2) Inner tube(longer than outer tube, 16 in. long, 5 mm outside dia.) - Small diameter plastic tube - can also be glass tubing (I recommend glass f you can get it).
3) Inlet and outlet tubes(2)(3 inches long, 5 mm outside dia.) - Small diameter plastic tube.
4) 2-hole rubber stoppers (2) - They fit tightly into the large diameter tube. No. 4 stoppers fit best for my set-up.
5) Rubber tubing(fits 5 mm outside dia. tubing)  - Used to run water into and out of the condenser. This is air tubing in the aquarium section.

First photo shows you the collected items.

Second photo shows how to assemble the inner tubing.

Third photo shows the condenser put together.

Fourth photo shows the condenser in working mode. Notice the baby fruit jar (I talked about this in the previous post) being used as the flask to be heated and the baby food jar(I talked about this in the previous post) is used for collecting.

Monday, August 6, 2012

Glassware

Glassware found at flee market

Improvised glassware for little or no cost

Glassware

In the top picture you can see a group of glassware that I found. I found this group of glassware all 45 pieces for $30.00 at a flee market. it consists of 6 - 400 ml, 6 - 250 ml, 6 - 100 ml beakers. 2 - 500 ml, 4 - 250 ml, 8 - 125 ml, 9 - 50 ml conical flasks. 2 - 500 ml volumetric flasks and 2 - 50 ml bottles. This was a great find.

If you are unlucky or can't afford to buy your own glassware, In the lower picture you can see the glassware I have and you can collect at little to no cost. For flasks you can use glass baby bottles and baby glass fruit juice bottles, these can be heated. These have measurement marks on them and hold about 100 ml. You can ask around your neighbourhood, friends and family if they can save you some (families with babies). Another good item that can be used as a flask is a coffee pot from a brewing station (not seen here).

For beakers you can use baby jars, they come in different sizes and can be heated. Another good source is mason or canning jars, they to come in different sizes and can be heated or sterilized. Also seen in the photo, I have used custard cups for petri dishes, mixing, culturing and condensing as watch glasses, etc.

As you can see there are many options for you to get your hands on much needed glassware. Have fun and keep looking you never what you will find.

Saturday, December 17, 2011

Another Old Science Kit


Another Old Science Kit

Here in the top picture you see another set I found, it doesn't have the box though. This is exactly the one my parents bought for me in the 1970's. It is the "Mr. Wizard Experiments in Crystal Growing". I really enjoyed playing with this, I always liked growing crystals. As you can see they gave you plenty of chemicals to work with back then. Mr. Wizard had some nice science kits in the 1970's. I had 2 of them the chemistry set and the crystal growing set.

The second picture is an old catalog from the The Perfect Parts Company. I remember once when we I was young and we where in the United States. I don't remember what store it was but they had a booth with this companies products and there was a huge line up of people trying to buy things. I had wished we had some place like this where I lived, finding lab equipment at a reasonable cost was hard for me when I was young. If you do web check you will find they still exist.

Wednesday, November 30, 2011

More Links

More Links

Low Cost Equipment for science and technology education:

http://unesdoc.unesco.org/images/0010/001023/102321eb.pdf

The second part:

http://unesdoc.unesco.org/images/0007/000728/072808eb.pdf

This link has science articles and experiments from the old magazine Modern Mechanix:

http://blog.modernmechanix.com/category/science/chemistry/

You will notice under my links some are no longer there. I have removed any links that are no longer working. Please remember when a new link goes up get the information you need and store it because you don't know how long it will be up.

Sunday, November 6, 2011

The Arduino


The Arduino

I have been looking at the Arduino for some time. I finally picked one up, as well as the first edition of "Getting Started with Arduino" by Massimo Banzi. This seems to be a simple and inexpensive way to learn and to use a micro controller. A way to connect different sensors to a computer. Just great for the home lab. It is an open source electronics prototyping platform. You can purchase one already built or you can get the parts and put it together yourself. The Arduino receives input from a variety of sensors, which can then control lights, motors, and other actuators.

There are many books on the arduino. I have just the one, "Getting Started with Arduino" by Massimo Banzi.

I will post arduino lab projects as I build them. I am looking into a spectrometer, digital thermometer, pH meter, etc. So stay tuned. But for the time being look at these websites, become familiar with the arduino and enjoy.

The home page for the Arduino can be found here:

www.arduino.cc

and the Getting Started with Arduino page is:

arduino.cc/en/Guide/HomePage

Another Beginners Arduino Tutorial can be found here:

www.ladyada.net/learn/arduino/

A project site:

www.practicalarduino.com/projects

Sunday, August 21, 2011

DIYBIO and Genetics

Over the past weekend I did some web surfing and I found this site called "Learn Genetics":

1) http://learn.genetics.utah.edu/

It teaches the basics of genetics. It shows you how to virtually build a DNA molecule, talks about DNA to protein and all the basics needed to understand genetics. There virtual labs such as 1) DNA extractions, 2) PCR, 3) Gel Electrophoresis and 4) DNA Microarray.

2) There is a link to HOW TO EXTRACT DNA FROM ANYTHING LIVING:

http://learn.genetics.utah.edu/content/labs/extraction/howto/

3) A link on how to build a gel electrophoresis chamber, including power supply (one of the best I have found):

http://learn.genetics.utah.edu/content/labs/gel/build_gel_box.pdf

A lot of what is on there can be transferred to using plastic dishes instead of building the chamber completely form scratch. But still the lessons for working with plastics are good an can be beneficial if you go that route.

4) Another link that shows you how to run that chamber using kitchen supplies such as agar, table salt, food colouring and filter papers (I would use coffee filters):

http://learn.genetics.utah.edu/content/labs/gel/electrophoresis/

5) Teachers Lesson Plans:

http://teach.genetics.utah.edu/content/

I have not had much time to go through this content yet but I plan to.

Over all a very interesting site with a lot of do-it-yourself projects.

Tuesday, June 14, 2011

More Links


Here I give you some more links to look at. Some you will find very important to the Citizen Scientist, where to find chemicals and even more importantly chemicals that are incompatible with each other.

1) This link has a very extensive list of commonly available chemicals and where you can find them:

http://en.wikipedia.org/wiki/List_of_commonly_available_chemicals

2) From the Ohio State University College of Biological Sciences this link gives you a list chemicals that are incompatible. I recommend printing this out and keeping it on a wall in your lab for future reference.

Incompatible Chemicals: http://www.biosci.ohio-state.edu/safety/safety/IncompatibleChemicals.htm

3) I believe that this maybe from the old Modern Mechanix magazine. It shows you how to make a distillation system, a ring stand, etc. Enjoy I did.

Equiping Your Chemical Lab: http://www.vintageprojects.com/science/chem-lab.pdf

4) This is a very large file and takes awhile to load. Every Citizen Scientist should have this and look through it. I even have it printed out, all 900 and so pages. It shows very simple items to build and up to larger more complicated lab equipment. This is the same book I have talked about before ( see link on my blog: This site no longer worksConstructing Inexpensive Lab Equipment) and that link is dead. This is all the pdf files put into one large file. So go and get it now while it is there.

Guidebook to Constructing Inexpensive Science Teaching Equipment: http://www.howtomakeeverything.com/CD3WD/JF/438/28-720.pdf

Friday, May 27, 2011

More Books


I have picked up a couple of interesting books, a couple of older 1960's books and one a little newer late 1990's:

1) Junior Science Projects - 1967 by the Editors of Science Experimenter:

This book has many experiments you can do and many pieces of equipment that you can build. Such as a milli-microampere detector, ion-exchange fuel cell, diffraction grating-type spectrscope, thermistor thermometer, make your own plastic lab equipment (see picture above) and more. Some of the electronic projects require specific tubes, but I am sure with internet searches you can find other ways to make them. A real interesting read.

2) Exploring Science in your Home Laboratory - 1963 by Richard Harbeck:

This book discusses how to build a home science laboratory for chemistry, biology, physics and geology. It walks you through choosing where to locate the lab, which one you would like to build first. Then helps you set it up, from building a work bench with shelves and then a way to remove the air if you don't have a window in your area. From here it helps you build different lab equipment for your lab, such as a simple electric heater, alcohol lamp, drying and sterilizing oven, test tube racks, stands, beam balance and more. This book must have been a real gem back in it's day.

3) A Low Cost Approach to PCR - 1998 by Eva Harris:

This is a good book for the DIYBIO groups. The low cost approach outlined in this book can be useful for the DIYBIO group. It provides a description of the theoretical basis of the technique and practical details of the method. There is a section on materials and chemicals needed in your lab. A section on building your own equipment ie. electohoresis chamber, micro centrifuge, etc. A section on preparing your reagents. I believe a very useful book for the DIYBIO person.

Saturday, May 14, 2011

Over Head Solution Mixer


Over Head Solution Mixer

I have been away for awhile. Other things came up and I was unable get back to doing any science and or experimenting. Here is something I did put together this weekend.

Using an old single head mixer, a cocktail swivel stick (it has a propeller at the end of it), lab stand and clamp I am able to make a solution mixer (see second picture). This mixer or stirrer works over head of the solution. Solution container can be a beaker, jar, glass or anything else.

It is very simple to make. I had to heat the end of the swivel stick (the portion that goes into the mixer) and then take a pair of pliers to some what flatten the end to fit it into the notches of the mixer. This holds the stick in and allows for the mixer to spin it.

Other items can be used instead of the mixer, such as, electric screwdriver(very inexpensive to buy or can be found. Most people through them away when the batteries stop holding their charge.), electric motors(such as found in dollar store fans and electric toothbrushes), etc.