Showing posts with label Science. Show all posts

Sunday, November 8, 2020

Another Science Kit

Science Kit

I found this kit at a second-hand store.

Magnetism Kit


"Magnetics Science Kit" - The science of magnets and ferrofluid. This second kit I also found for $10 at a second-hand store. I have wanted to start to look at ferrofluids and when I found this I figured this would be good way to start.


It comes with:
1 bottle of ferrofluid
iron filings
15 magnets
steel balls
copper tube
PVC track
Experiment guide
Etc.

I will more than likely still produce my own ferrofluids (you can find this online) but this gives me a start.

Finding kits at reduced or discounted prices (look after Christmas) and or used kits at second hand shops you are still able to get started in many different sciences and build your own lab.

Tuesday, July 14, 2020

Books New and Old - Build It Yourself Science Laboratory

Written by Raymond E. Barrett.

Written in 1963

This is one book that I found at my library when I was younger. It was one of a handful of books that taught me science. I would take it out as much as I was allowed to. I read and reread it over and over again. I created many of the projects and did many of the experiments that you find in the question sections.

I was already building my lab from what ever I could find and re-purpose for use at home. So I was so excited when I found this book. I believe I really wore out this book. It was still on the library shelves until around 8 or so years ago. One day I went to find it and it was no longer there. I did end up finding a used copy later on so I purchased it for my own library.

It is broken up into 3 sections: Chemistry, Physics and Biology. Physics was broken up into 6 other sections: Astronomy and Light, Atomic Energy, Electricity and Magnetism, Forces, Measurement and Motion, Geology and Meteorology.


Written 2015

The book has been re-edited and reprinted "the annotated Build-It-Yourself Science Laboratory" and now brings it up to date. Some things that are used in the original book are not legal or are dangerous or can not be found any longer. This new book helps to make it more useful for today's scientist.

Projects include:
Cloud Chamber
Vacuum pump
Microscope
Barometer
Radiometer
Microtome
Etc.

Over 100 pieces of equipment and 100's of projects. This book is a great way to learn to look at items and see other uses for them.

Monday, May 25, 2020

Spectrometer Version 3 Continued


Figure 1


I have been continuing the build for version 3 which holds the sample inside the container. In figure 1 you see the 3D printed sample holder, here I have a test tube but it does hold cuvettes as well. Next to the holder on the right you can see an LED. This one is a bright white LED. I intend to use a RGB LED so I can choice different colours or wavelengths. It will also be removable so I can use IR and UV LEDs.

Figure 2

Figure 3

In figure 2, I use a 3D printed slit holder and then mount 2 single edge razor blades which are adjustable. With the other 3D printed parts I hold the slit mechanism in place within the spectrometer. This allows for removal of the slit so it can be adjusted. In Figure 3 you can see the unit put together.

Figure 4
And in figure 4 you see allthe components put together with the sample and slit holder, LED source, diffraction grading and web cam all in one box.

This is all put together in a wooden box I found at a dollar store. I still intend to make this smaller so I can easily carry with me. I do have access to a 3D printer so it was easier for me to print the parts I needed. But all the parts could be very easily cut from foamboard.


Sunday, January 19, 2020


Digital Microscope Version 2

This microscope views the specimen from below. Here I use parts from an old CD-Rom drive, a web cam, block of wood to hold it together, laser pointer lens, some foam board and glue.


Fig. 1


Taking apart the CD-ROM (fig 1) I keep the carriage that moves laser LED along the CD. This allows the specimen stage to move up and down to focus it. The gears on the side are used for the focusing, the bottom gear is used for regular focus and the top gear is used for fine focusing. I manually move the gears. I may look into using the gear motor to electrically move the stage.


Fig. 2


I mount the carriage on a thick piece of wood (fig 2) to allow stage movement and support.


Fig. 3


The specimen mount (fig 2, right of image), is made from foam board. and (fig 3) then mounted on the carriage with Gorilla glue.


Fig. 4


Fig. 5


Fig 4 and 5 show the whole thing put together. You can see the stage is up and then is lowered to focus the image.

To raise the magnification of the camera I used the lens in a cheap laser pointer and mounting it  on the lens of the camera. This does give higher magnification, about 100-150x but is not as powerful as a compound microscope which can get to 800-1000x. I found that when using live mounts, living organisms many times it is best to view them from underneath.

All the parts I had were just laying around which made this a very inexpensive build. I am sure that it is easy to find a junked or used CD-Rom or DVD. The camera is just a cheap webcam again something you might be able to find from a friend or thrift shop. Mine was a dollar store purchase for $3. I find that this microscope does work better than my first version, especially with the focusing.

Thursday, December 12, 2019

Stocking Stuffers

 Stocking Stuffers

If you need some stocking stuffers for your budding scientist here are some items I found at dollar stores that are very useful for any ones lab.


Holder for my stains


In this picture you will see I found some plastic dropper bottles, which can be used to hold microscope stains or chemical solutions for experiments and storage. These bottles fit nicely into the lipstick holder I found there as well. It perfectly holds 12 of these dropper bottles in nice neat rows. The top row is larger and does not separate the bottles. I hold alcohol swabs (another stocking stuffer) in the top row.


Dollar store finds


In this picture there is a q-tip holder and q-tips. I use these for alcohol and acetone applicators. The 2 bottles have a push top that allows for the pumping out of alcohol and/or acetone. Cotton balls and a container to hold them. Cotton swabs, smaller plastic jars that can hold chemicals and specimens in.

I have also found medicine droppers, food colouring, etc. As can be seen here there are many inexpensive items that can be used in the lab, that are inexpensive enough for stocking stuffers.

Wednesday, October 2, 2019

A Simple Optical Bench

A Simple Optical Bench

All the parts for holding lens and filters

Testing the different parts


With a metal cookie tin, first surface mirror, clear CD holder(beam splitter), laser pointer or other light source (LED), magnetic tape strips and 3D printed holders I am able to put together a very simple optical bench.

The first surface mirror which I found at a surplus store is made into smaller pieces. If you can't find a first surface mirror an old hard drive plater will work fine. A first surface mirror has mirroring on the front glass surface and not on the back side of the glass such as most mirrors.

I am lucking that I have access to a 3D printer. It is one of the best tools for making things you want to build with out having a metal or wood working shop.

I 3D printed holders for defraction grading film, polarized film, laser pointer or LED light source, light slit, mirrors, beam splitter, camera, etc. I use magnetic tape strips and mount them on the bottom of the holders so they hold on to the flat metal surface of the cookie tin. I super glue the magnetic strips to the 3D printed object. I am finding the tape strip is not holding very well to the plastic.

If you don't have access to a 3D printer you can use metal "L" brackets or Lego parts or even plastic that has 90 degree angles to make your holders. Even flat plastic can be bent using a hair dryer to shape the holders.

I built this because I am going to try and make a spectrometer. I will talk about this later.

Friday, August 17, 2012

Condenser

Photo 1 - Parts for Condenser

Photo 2 - Inner assembly

Photo 3 - Fully assembled

Photo 4 - Full set-up


Condenser


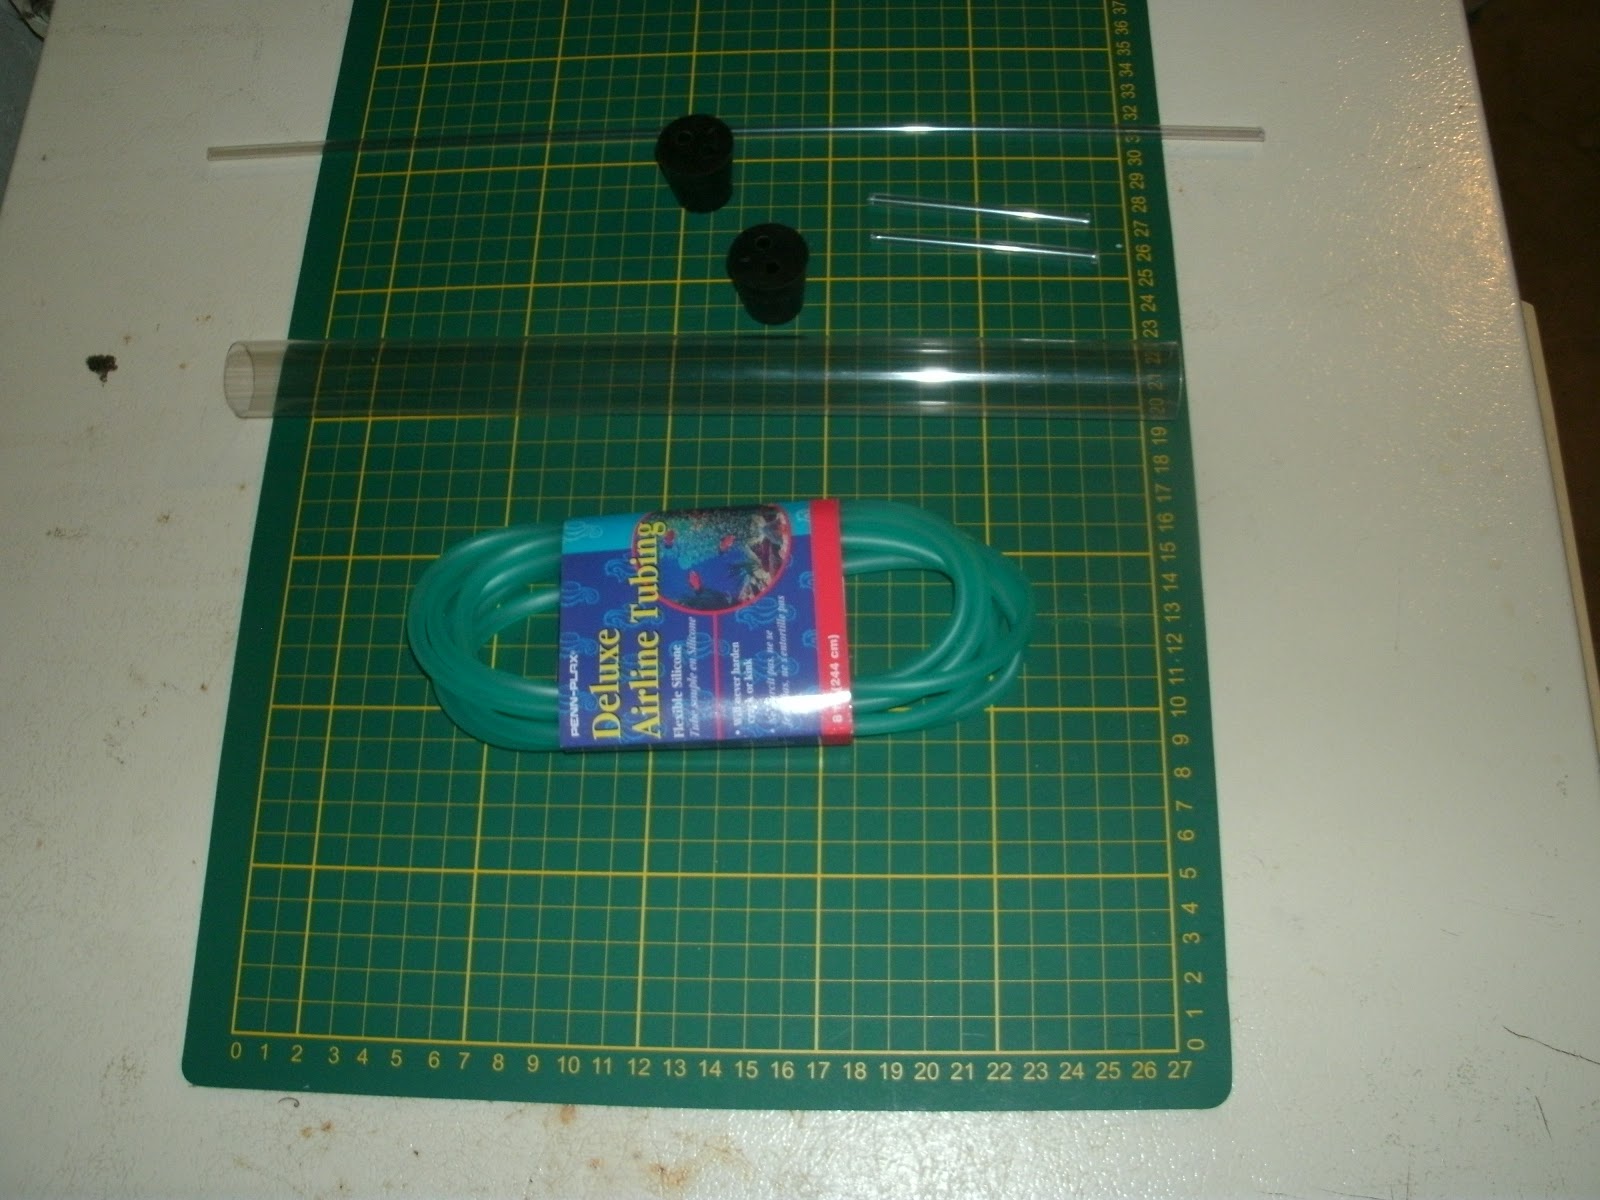
A condenser is used for distilling and separating chemicals in fluids. They can be a very expensive item. In the photos above you can see how I made one from items I found in a pet store - total cost less than $5.00.

Items needed:

1) Outer tube (approx. 12 in. long, 22 mm inside dia.) - Large diameter plastic tube - can any kind of tube clear plastic, white plastic or black plastic tubes. As well as copper or glass tubes.
2) Inner tube(longer than outer tube, 16 in. long, 5 mm outside dia.) - Small diameter plastic tube - can also be glass tubing (I recommend glass f you can get it).
3) Inlet and outlet tubes(2)(3 inches long, 5 mm outside dia.) - Small diameter plastic tube.
4) 2-hole rubber stoppers (2) - They fit tightly into the large diameter tube. No. 4 stoppers fit best for my set-up.
5) Rubber tubing(fits 5 mm outside dia. tubing)  - Used to run water into and out of the condenser. This is air tubing in the aquarium section.

First photo shows you the collected items.

Second photo shows how to assemble the inner tubing.

Third photo shows the condenser put together.

Fourth photo shows the condenser in working mode. Notice the baby fruit jar (I talked about this in the previous post) being used as the flask to be heated and the baby food jar(I talked about this in the previous post) is used for collecting.

Thursday, November 18, 2010

More Lab Chemicals

Here is more to add to the list of chemicals that you can collect for your home lab and where you might be able to get them:

Acetone - (H, D)
Alcohol – Isopropyl (D)
Aluminum potassium sulfate - Alum (G)
Ammonium carbonate - smelling salts (D)
Butane - lighter fluid (department stores)
Calcium Hydroxide - Garden lime (garden stores)
Calcium Oxide - quicklime (H)
Ferric Chloride – circuit board etching (electronics store)
Hydrogen Peroxide – (D)
Lead - fishing weights (sports stores)
Methanol – methyl hydrate solvent (paint stores)
Naphthalene - moth balls (Department stores)
Sulfuric acid - car battery acid (car supply)
Toluene – solvent (paint stores)

I will continue to look for everyday chemicals that can be used in a citizen of science's lab.

Sunday, September 26, 2010

Lab Chemicals


As can be seen above I don't keep large quantities of chemicals and all are labeled. Chemicals are the foundation of most labs and experiments. You will need at least some chemicals to do experiments.

Here is a small list of chemicals that you can collect for your home lab and where you might be able to get them. They will get you started:

G - grocery store
D - drug store
H - hardware store

Acetic Acid - pure white vinegar (G)
Aluminium - foil (G)
Ammonium Bicarbonate - spices (G)
Ammonium Chloride - soldering flux (electronics store)
Ammonium Hydroxide - household ammonia (D,H,G)
Aluminium Sulphate - (gardening store)
Ascorbic Acid - spices (G)
Boric Acid - ant and roach killer (H,G)
Calcium Carbonate - tums, chalk (D)
Calcium Chloride - drying agent (H)
Calcium Hypochlorite - bleaching powder (G)
Calcium Sulphate - plaster of paris (H)
Charcoal - (aquarium store)
Citric Acid - spices (G)
Copper - wire (H)
Copper Sulphate - drain cleaner (H)
Corn Starch - (D,G)
Denatured Alcohol - shellac thinner (H)
Glycerin - glycerol (D)
Hydrochloric Acid - muriatic acid (H)
Iron - steel wool, nails (H)
Manganese Dioxide - black material in regular batteries (D,H,G)
Magnesium Sulphate - epsom salts (D)
Sodium Bicarbonate - baking soda (G)
Sodium Bisulphate - Sani-Flush (H,G)
Sodium Borate - Borax (G)
Sodium Carbonate - washing soda (G)
Sodium Chloride - table salt non-iodized (G)
Sodium Hydroxide - Drano (H)
Sodium Silicate - crystal garden kits (toy store)
Sucrose - table sugar (G)
Trisodium Phosphate - TSP (G)
Turmeric - spices (G)
Zinc - metal found in regular batteries (D,H,G)

Tuesday, May 11, 2010

More Science Kits (Electronic)


Here you can see 3 different electronic kits, 2 of which I found at garage sales and one I found at a surplus store.

1) A 75 in-one kit. It is an older kit and was from Radio Shack.

2) A 130-in-one kit, again it came from the old Radio Shack stores. It to is an older kit.

Both of these were found at garage sales and cost very little to buy.

3) A 300-in-one kit(the white one). This is a new kit and it allows for the mounting of microchips and electronic parts. It was at a surplus store for about a third of the cost.

These kits are great. They allow you to put circuits together for testing without any soldering. It makes it easier to try different things without having to solder and desolder parts to see if they will work together. If you intend to build anything with electronics this is a good way to test it and I believe most labs should have one or two.