Showing posts with label homelab. Show all posts

Thursday, November 11, 2021

Power Supply

Instead of using wall transformers to power my equipment, I decided to see if I could easily build a variable power supply. This way I can add the same connectors to the hardware and use them with the same power supply. I had an old power adapter from a HP printer laying around. I like to try and use old hardware to build new things. It gives off 19 volts and 7.1 amps. So I started looking for a way to control/vary the power coming from the adapter.So I picked up this DC DC Buck Converter CC CV 50V 5A Power Module.

Components for Power Supply


Power Supply Working


Now I don't have to have all these different wall transformers taking up space. I intend to either build a box from some plastic I have laying around or maybe 3D print the case. I will come back to it when it is done.

Monday, May 25, 2020

Spectrometer Version 3 Continued


Figure 1


I have been continuing the build for version 3 which holds the sample inside the container. In figure 1 you see the 3D printed sample holder, here I have a test tube but it does hold cuvettes as well. Next to the holder on the right you can see an LED. This one is a bright white LED. I intend to use a RGB LED so I can choice different colours or wavelengths. It will also be removable so I can use IR and UV LEDs.

Figure 2

Figure 3

In figure 2, I use a 3D printed slit holder and then mount 2 single edge razor blades which are adjustable. With the other 3D printed parts I hold the slit mechanism in place within the spectrometer. This allows for removal of the slit so it can be adjusted. In Figure 3 you can see the unit put together.

Figure 4
And in figure 4 you see allthe components put together with the sample and slit holder, LED source, diffraction grading and web cam all in one box.

This is all put together in a wooden box I found at a dollar store. I still intend to make this smaller so I can easily carry with me. I do have access to a 3D printer so it was easier for me to print the parts I needed. But all the parts could be very easily cut from foamboard.


Sunday, January 19, 2020


Digital Microscope Version 2

This microscope views the specimen from below. Here I use parts from an old CD-Rom drive, a web cam, block of wood to hold it together, laser pointer lens, some foam board and glue.


Fig. 1


Taking apart the CD-ROM (fig 1) I keep the carriage that moves laser LED along the CD. This allows the specimen stage to move up and down to focus it. The gears on the side are used for the focusing, the bottom gear is used for regular focus and the top gear is used for fine focusing. I manually move the gears. I may look into using the gear motor to electrically move the stage.


Fig. 2


I mount the carriage on a thick piece of wood (fig 2) to allow stage movement and support.


Fig. 3


The specimen mount (fig 2, right of image), is made from foam board. and (fig 3) then mounted on the carriage with Gorilla glue.


Fig. 4


Fig. 5


Fig 4 and 5 show the whole thing put together. You can see the stage is up and then is lowered to focus the image.

To raise the magnification of the camera I used the lens in a cheap laser pointer and mounting it  on the lens of the camera. This does give higher magnification, about 100-150x but is not as powerful as a compound microscope which can get to 800-1000x. I found that when using live mounts, living organisms many times it is best to view them from underneath.

All the parts I had were just laying around which made this a very inexpensive build. I am sure that it is easy to find a junked or used CD-Rom or DVD. The camera is just a cheap webcam again something you might be able to find from a friend or thrift shop. Mine was a dollar store purchase for $3. I find that this microscope does work better than my first version, especially with the focusing.

Tuesday, January 6, 2015

3D Printing

Electrophoresis Chamber

Dremelfuge

Vessel Holders


3D Printing

3D printing is becoming more accessible to the average person. Maker spaces usually have one or two that would allow you to use. 3D printing is another good way to make lab equipment, here are a few items I have printed:
                   
In the top picture you will see a electrophoresis chamber made from a soap dish and 3D printed gel chamber and comb. I could have printed the whole chamber but I used a soap dish that I already had to save on plastic.

In the next picture I printed the dremelfuge which I have talked about in an earlier post. I printed both with chuck and with-out. So far I only used it with a drill. I still do not feel safe using it with a Dremel without enclosing it in some sort of housing to protect myself.

The last picture shows vessel holders for beakers, flasks and jars that I will attach to a shaker machine. I will talk about this in a later post.

You can find these items at :

http://www.thingiverse.com/

There are many other sites you can get 3D objects from.

Thursday, October 16, 2014

Water Bath

Water Bath Prototype

Driver Board

With the help of a member from my maker space, we are trying to create a working water bath that uses a arduino to control the temperature. If we are able to make it work properly we will open source it. We are looking to develop either a arduino shield or it's own driver board to run the water bath.

We trying to have it set to 42 degrees C. This is the temperature used for bacterial transformation(the heat shock method). It is working very steady with about 0.25 degree C on either side of 42 C. We are going to try at different temperatures next.

The top picture shows the setup, it is a power supply(top middle of picture), an arduino on a driver board(black box next to the power supply) built by a member of my maker space, a heating pad, LM35 temperature sensor and a plastic container(sitting on the heating pad). The lid must be on to bring up the heat and keep it at a steady temperature.

The next picture shows an arduino temperature driver board.

Sunday, September 14, 2014

New Centrifuge From the Old


New Incubator


I found this inexpensive centrifuge and brought it home to find it not working. I took it apart and cleaned it up. It only needed rewiring to get it up and running. Now with this I am able to retire my blenderfuge. In the blenderfuge the center piece kept warping and had to be replaced. I believe this was caused by the very high speeds of the blender. The blenderfuge was much faster than this centrifuge but this one will work for my needs.

Friday, November 8, 2013

Sample Rotator

Parts

Front View

Side View

With very simple items I had laying around I was able to build this sample rotator. It rotates very slowly. This will allow samples to be mixed. I hope to place it in my incubator to attempt to use as a shaker for the media broth for cultures (continual mixing).

Parts: the motor came from an old hand-held vacuum, I bolted a disk from the bottom of a cd holder on to it. The frame is from an old computer power supply box (the top half). I use 1 inch PVC conduit clamps to hold the motor in place. I use broom handle wall clips to hold my culture tubes. They had to be adjusted to fit both 15 ml and 50 ml tubes. They are mounted on the plastic disk with nuts and bolts. It runs using a power supply that ranges from 1.5v - 12 v.

Monday, October 21, 2013

Incubator

Older Incubator
I picked this old incubator up very inexpensively. It was not working. I took it apart and the wiring was removed. I rewired it and tested it out. The heating panel works and so does the thermostat.

It is an old metal box. I intend to add some insulation, either Styrofoam or corrugated cardboard or plastic to keep the temperature more stable. At first I thought maybe I would mount it on the outside of the incubator but as I think more about it I believe it might work better on the inside as this might be easier to clean than metal walls.

I will revisit this when it is finished.

I now have 2 incubators the earlier one I built which goes up to about 30 degrees C and this one which goes up to at least 40 degrees.

I found this link to the pdf file for The Amateur Scientist by C. L. Stong. This is a classic with experiments in archaeology, biology, physics, electronics, etc. These are projects from Scientific American's The Amateur Scientist column.

http://ia801502.us.archive.org/33/items/TheAmateurScientist/Stong-TheAmateurScientist.pdf

Monday, September 23, 2013

Sterile Chamber

Baby Incubator Cover


I found this item, a baby incubator cover that was very inexpensive. I am using it to build a sterile chamber to do culturing in. It has plenty of room inside it and plenty of arm maneuverability to be comfortable to do projects in it.

I will mount it on a vinyl covered piece of plywood or press board. Add a fan that blows the air out and in through a Hepa filter. I will sterilize it with a Lysol/alcohol solution. This will keep the work area in a fairly stable environment, I won't be breathing over the work area or as I move sending dust and particles into the chamber. This should work better than the aquarium that was put together earlier.

I will keep post further as I finish it up.

Update Link

The Golden Book of Chemistry Experiments:

http://chemistry.about.com/library/goldenchem.pdf

Sunday, June 2, 2013

DremelFuge - centrifuge

Warning - be careful when using or building a centrifuge, they are very dangerous. If at all possible try and buy a professional one.

Here is a centrifuge created by Cathal Garvey called DremelFuge. It can be found here:

http://www.thingiverse.com/thing:1483

It uses standard 1.5ml/2ml Eppendorf/Microcentrifuge tubes. Works with both a drill or Dremel.

DremelFuge

I was trying to get it printed out but I was having trouble with it. So I decided I would try to make my own from parts laying around. It consists of a 3.5 inch PVC plumbing cap and a bolt, nut and washer. As seen below I have it running on a drill press. I did try it on a dremel, it worked, but I would not use it that way unless a closed off compartent is built for it (later project).

Homemade dremelfuge

Working in drill press

Saturday, September 8, 2012

Even More Books

Modern Book

Older Books

I have picked up 3 more books for my library. 2 are older and from a better time for citizen science. The other one newer but important for the amateur scientist. (I truly dislike using amateur or citizen scientist. It gives the impression that real science can not be done by them.)

1) Apparatus - 1967 by F. F. Blackwell.

This book shows you how to build various science equipment from household materials. Focusing more on the physical sciences but can be applied to the biological as well. Sections include:

Elementary electricity, Biological apparatus, Light, Machines, Air, Sound and heat, Water, Weather and soil studies.

2) Procedures in Experimental Physics - by John Strong. Originally published in 1938 republished 1986.

Another book dealing with physics. It has great explanations of certain techniques. This book and The Amateur Scientist by C.L. Stong make for great physics experiments of old. Sections include:

Glass blowing, High Vacuum technique, Optical work, Photoelectric cells, Heat and high temperature, Molds and casting, etc.

3) The Laboratory Companion: A Practical Guide to Materials Equipment and Technique - by Gary S. Coyne 2006.

This is a very useful book that discusses the different materials used in labs and how to maintain them. This is a modern book discussing modern equipment.

When I look at some of the older books I pick up I can't believe how many books existed that helped young people build their own labs and equipment. A far cry from what you find today. I am glad that I am still able to find some of them.

Friday, August 17, 2012

Condenser

Photo 1 - Parts for Condenser

Photo 2 - Inner assembly

Photo 3 - Fully assembled

Photo 4 - Full set-up


Condenser


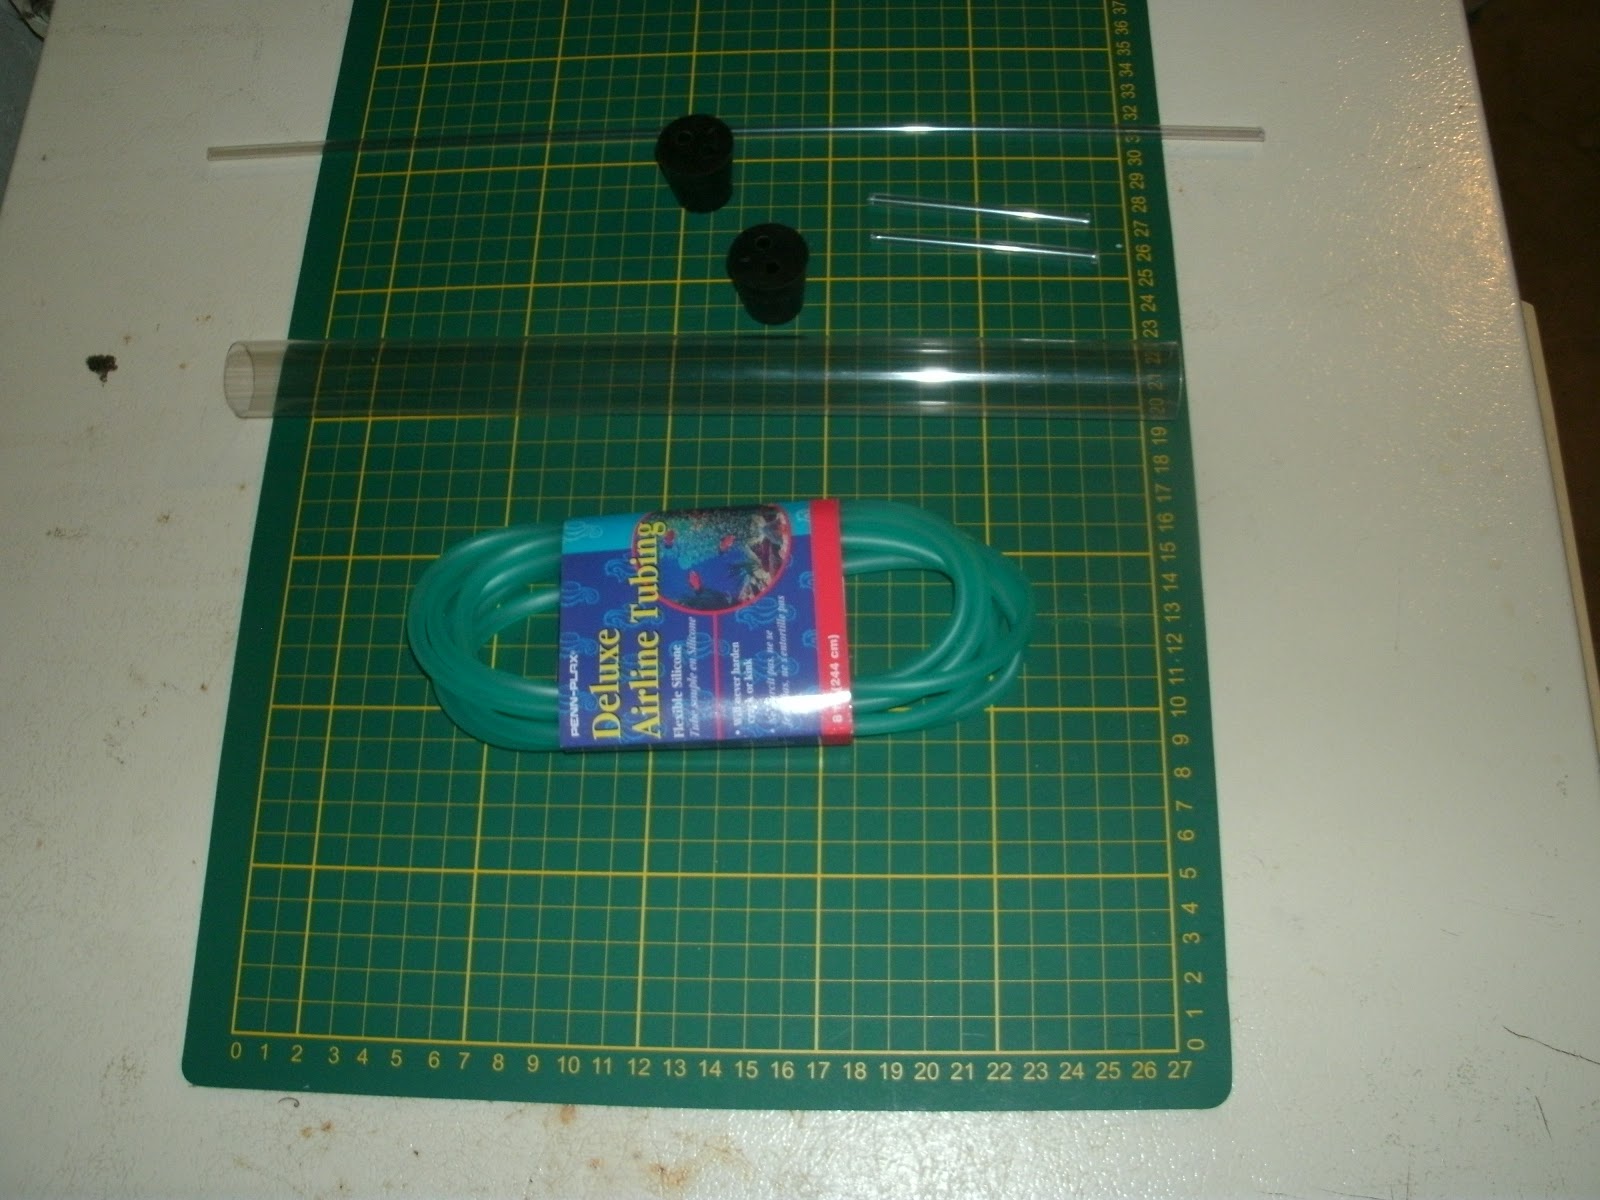
A condenser is used for distilling and separating chemicals in fluids. They can be a very expensive item. In the photos above you can see how I made one from items I found in a pet store - total cost less than $5.00.

Items needed:

1) Outer tube (approx. 12 in. long, 22 mm inside dia.) - Large diameter plastic tube - can any kind of tube clear plastic, white plastic or black plastic tubes. As well as copper or glass tubes.
2) Inner tube(longer than outer tube, 16 in. long, 5 mm outside dia.) - Small diameter plastic tube - can also be glass tubing (I recommend glass f you can get it).
3) Inlet and outlet tubes(2)(3 inches long, 5 mm outside dia.) - Small diameter plastic tube.
4) 2-hole rubber stoppers (2) - They fit tightly into the large diameter tube. No. 4 stoppers fit best for my set-up.
5) Rubber tubing(fits 5 mm outside dia. tubing)  - Used to run water into and out of the condenser. This is air tubing in the aquarium section.

First photo shows you the collected items.

Second photo shows how to assemble the inner tubing.

Third photo shows the condenser put together.

Fourth photo shows the condenser in working mode. Notice the baby fruit jar (I talked about this in the previous post) being used as the flask to be heated and the baby food jar(I talked about this in the previous post) is used for collecting.

Monday, August 6, 2012

Glassware

Glassware found at flee market

Improvised glassware for little or no cost

Glassware

In the top picture you can see a group of glassware that I found. I found this group of glassware all 45 pieces for $30.00 at a flee market. it consists of 6 - 400 ml, 6 - 250 ml, 6 - 100 ml beakers. 2 - 500 ml, 4 - 250 ml, 8 - 125 ml, 9 - 50 ml conical flasks. 2 - 500 ml volumetric flasks and 2 - 50 ml bottles. This was a great find.

If you are unlucky or can't afford to buy your own glassware, In the lower picture you can see the glassware I have and you can collect at little to no cost. For flasks you can use glass baby bottles and baby glass fruit juice bottles, these can be heated. These have measurement marks on them and hold about 100 ml. You can ask around your neighbourhood, friends and family if they can save you some (families with babies). Another good item that can be used as a flask is a coffee pot from a brewing station (not seen here).

For beakers you can use baby jars, they come in different sizes and can be heated. Another good source is mason or canning jars, they to come in different sizes and can be heated or sterilized. Also seen in the photo, I have used custard cups for petri dishes, mixing, culturing and condensing as watch glasses, etc.

As you can see there are many options for you to get your hands on much needed glassware. Have fun and keep looking you never what you will find.

Wednesday, November 30, 2011

More Links

More Links

Low Cost Equipment for science and technology education:

http://unesdoc.unesco.org/images/0010/001023/102321eb.pdf

The second part:

http://unesdoc.unesco.org/images/0007/000728/072808eb.pdf

This link has science articles and experiments from the old magazine Modern Mechanix:

http://blog.modernmechanix.com/category/science/chemistry/

You will notice under my links some are no longer there. I have removed any links that are no longer working. Please remember when a new link goes up get the information you need and store it because you don't know how long it will be up.

Friday, May 27, 2011

More Books


I have picked up a couple of interesting books, a couple of older 1960's books and one a little newer late 1990's:

1) Junior Science Projects - 1967 by the Editors of Science Experimenter:

This book has many experiments you can do and many pieces of equipment that you can build. Such as a milli-microampere detector, ion-exchange fuel cell, diffraction grating-type spectrscope, thermistor thermometer, make your own plastic lab equipment (see picture above) and more. Some of the electronic projects require specific tubes, but I am sure with internet searches you can find other ways to make them. A real interesting read.

2) Exploring Science in your Home Laboratory - 1963 by Richard Harbeck:

This book discusses how to build a home science laboratory for chemistry, biology, physics and geology. It walks you through choosing where to locate the lab, which one you would like to build first. Then helps you set it up, from building a work bench with shelves and then a way to remove the air if you don't have a window in your area. From here it helps you build different lab equipment for your lab, such as a simple electric heater, alcohol lamp, drying and sterilizing oven, test tube racks, stands, beam balance and more. This book must have been a real gem back in it's day.

3) A Low Cost Approach to PCR - 1998 by Eva Harris:

This is a good book for the DIYBIO groups. The low cost approach outlined in this book can be useful for the DIYBIO group. It provides a description of the theoretical basis of the technique and practical details of the method. There is a section on materials and chemicals needed in your lab. A section on building your own equipment ie. electohoresis chamber, micro centrifuge, etc. A section on preparing your reagents. I believe a very useful book for the DIYBIO person.

Tuesday, January 26, 2010

More Useful Links

1) I would like to thank Tom, a viewer of this blog. He sent me the following link for Constructing Inexpensive Lab Equipment. The link I have as I talked about before is no longer working. I browsed the link Tom gave me and I was able to download the files from there. There are many pdf files to get, so go get them before they get lost.

http://web.archive.org/web/20070704042228/icase.unl.edu/guidbo
ks/guidebok.htm

Here are some more important websites for the citizen scientist.

2) This pdf file was sent to me by Jake(thanks Jake) another reader of the blog. I was able to find a link for it.

The Golden Book of Chemistry Experiments - How to Set Up a Home Laboratory - Over 200 Simple Experiments by Robert Brent. I have the soft cover version of this book and I am very glad to find a pdf of it. This way I do not have use the original and worry about damaging it. When looking at this book on the internet you find that many talk about it being a dangerous book, but again let us face the facts that is what can make science fun. So be careful with it. It shows how to setup a home lab and build some of the equipment needed. It has many chemistry experiments as well.

http://chemistry.about.com/library/goldenchem.pdf

3) This link gives you a list of chemicals to outfit your lab and where you might be able to find them. It is part of the Make Science Room. It is a good source I have been searching to see if I can find many of these chemicals especially here in Canada.

http://blog.makezine.com/science_room/general/setting_up_a_home
_science_lab3/

All 3 of these links and all other links are posted on my Links portion of the blog, lower right hand.

Again I would like to thank many of my readers for their responses and ideas. With input from others it will make this a better blog.